Saturday, 4 May 2019

Batch Install APKs on an Android Phone

You might be familiar with the situation if you're the kind of person who flashes a lot of Custom ROMs on his device (maybe on his primary device for whatever reason), setting up the device for use after reset is always a huge pain (trust me I been in those shoes!), In those situations batch installing APKs can do a considerable amount of help. Okay enough intro let's get cookin'.

Backing up APKs 

To get the APKs for installation, you can either download the APKs from a trusted website like "apkmirror" or just perform a backup before doing a reset, you can do that by downloading an app like "App Backup and Restore" and clicking Archive, Once you have APKs ready, you can move on to the next step.

Setting Up the ADB

     
     To set up ADB, just download the platform tools from the link, extract it and copy it to the root of your operating system, say C:\ 

  • Open up command prompt and type in adb 
  • If everything was done correctly, you should see some text scrolling on


Batch Installing APKs


  • Connect your phone to your computer using an USB cable
  • On your phone, Go to Settings > About Phone and tap on build number seven times until it says "You are now a Developer", enter the PIN if prompted
  • Go to Settings > Developer Options and enable Android Debugging or USB Debugging
  • On your computer, open up the command prompt and type in adb devices
  • Your Android device will ask for a confirmation, check the box and click allow
  • On your computer make a folder named apk in the Desktop and copy all the apks to the folder
  • On the command prompt,
    • Type in cd the\dir\where\the\apks\are
    • Type in  for /r %f in (*.apk) do adb install -r "%f"

You should see the apps are getting installed on your phone!
Tuesday, 28 November 2017

Installing Ubuntu 17.10 in Virtualbox

Virtual Machines are highly flexible and useful whether you are a amateur or a rookie to the functioning of Operating Systems. It avoids the need risking your precious data while formatting and installing a new operating system, it may be your hobby or your profession to test new operating systems or you may be the one who wants to check "What happens if I delete the System32 folder!?". Don't be scared if anything goes wrong you can always simply delete your virtual machine and start over, I guess you won't put your precious data in virtual machines, Okay Enough intro let's switch to Topic.
logo-ubuntu_st_no®-black_orange-hex
Speaking of flexibility VMware and Virtualbox come into play. Virtualbox is an open source Hypervisor and VMware, used by professionals is a Commercial ware, meaning you have to pay for it. For most of our needs Virtualbox gets the job done and you can see the interface is very clean and it will be easier for new users. In our case, we're gonna see a Virtualbox based tutorial, as it is free and easier to start with.


Step 1: Download Virtualbox

Head to www.virtualbox.org and download the latest version of Virtualbox based on your host operating system, Just click download Virtualbox > Your Host

Step 2: Install Virtualbox

For Mac and Windows hosts you can easily install by following the on screen instructions.
For Linux hosts press ctrl+alt+T to open terminal, type in "sudo apt-get update" to update the repository, go to software center (based on your distro) then search for Virtualbox then click install, if your distro doesn't come with a software center, you can install Virtualbox by typing in "sudo apt-get install virtualbox"

Step 3: Download Ubuntu 17.10 disc image (or ISO)

You can download the .iso image from this link by navigating to the one suitable for your computer, you must know the architecture of your processor i.e 32 bit (x86) or 64 bit (x64). The procedure for installation is same for both the cases.


Step 4: Installing Ubuntu!

  • On the Virtualbox screen press ctrl+N to create a new virtual machine.Screenshot (2)
  • On the small window select Type as Linux and Version as Ubuntu (64 or 32 bit based on your processor).
  • Allocate the RAM for your OS, It's good to stick with the default amount, but in some cases for "HEAVY" Operating systems allocating the half of your physical memory might be a good idea.Screenshot (4)
  • Create a new hard disk, You can choose either a fixed or dynamically allocating storage mediums, I personally prefer Dynamically allocated for smaller physical mechanical drives. Choose the location for storing your hard drive and its format, if you thinking of using your machine with VMware or other Hypervisor, choose VMDK, otherwise stick with VDI. Choose the size you want and give a name for it, for Ubuntu 32 Gigs will be enough.
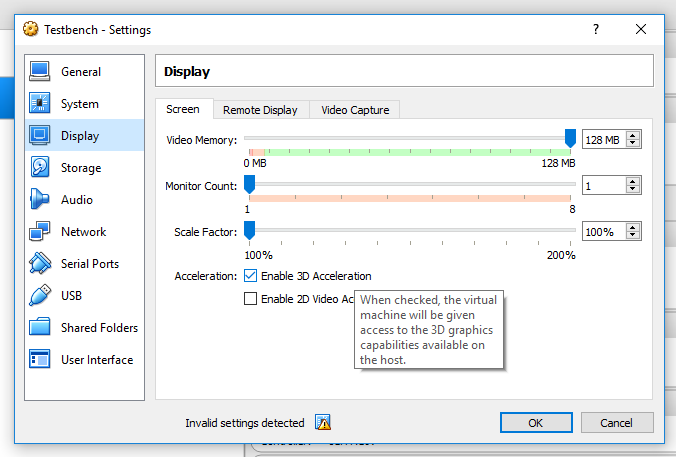
  • Select your machine and press ctrl+s to bring settings, from there customize the boot order, Increase the no of processor cores for your machine and on the display section allocate the max. video memory and check 3D acceleration for better performance and on the storage section click on the optical drive>choose disk and navigate the .iso image you just downloaded and click save,Screenshot (11)
  • Double click the virtual machine to start, it will get you into the Ubuntu welcome screen, there you will have two options either to try or install ubuntu. You can try Ubuntu from your .iso image, If you choose to install it will get you into the installation screen .
  • For clean installation select "Erase everything and install Ubuntu", If you don't want to mess up with partitions and mount points choose "Automatically format partitions" and there you'll have to choose your language, keyboard layout and time zone.
  • The installation will take about 15-20 minutes depending on your storage media and your computer, after that the VM will restart and you are ready to rock!
  • For improved Visual effects and performance, Power ON the VM and on the Virtualbox menu,  on the devices tab, click "Insert Guest additions cd image"
  • On the VM run the software and and restart after the process is completed, After restart you will have your VM greeting you in a Full screen.
  • Use the VM like you would use a regular physical computer, after finishing your work in VM, just shut it down to release the system resources such as Physical memory and Processor cycles.